

Gardening doesn’t have to be complicated. Learn how to germinate seeds with simple steps and create a beautiful garden that will produce delicious fruits and veggies all summer.

Gardening has become my new favorite hobby. Over the years, I have been determined to learn how to germinate seeds and put my gardening skills to the test. I remember starting my first year by germinating only a few tomato plants and basil on the balcony of our apartment. Since then, I’ve slowly beefed up my germination game every year.
I’ve never been one to test the pH level of my soil or research every little step along the way. We ensure our soil is tilled and replenished with fresh wood ash, leaves, and compost every season before heading into the next growing season. From there, I’ve found some success in growing delicious vegetables.

I started as a very “unintentional” gardener who was happy with some success, and now I am slowly transitioning into an “intentional” gardener. I am trying to produce a decent yield for my family to enjoy all summer and preserve some for the non-growing season. So, let’s continue to learn these new skills together.
Seed Germination - How does it work?
Germinating seeds is simple; you need only soil, water, and a little sunlight. However, some tricks to the trade will help you achieve more success. The best part is that this process uses minimal supplies and is extremely cost-effective! You can watch your garden grow before your very eyes. I love that it gives me a little glimpse into spring. Winter is ending, and fresh new blooms will soon be taking place.

Preparing Your Timeline -
If I’ve learned anything throughout the years of gardening, most of your garden is planning your calendar correctly!
Before we get started on germinating seeds, you will want to look up the last frost date in your area. Depending on your region, the date will vary on when you can sow your seedlings into your garden bed. You will want to plant at least 6-8 weeks before your last frost date to have enough time to germinate your seeds.

I recommend The Old Farmer’s Almanac, an excellent resource for learning about your specific growing zone, the soil you have, the length of the growing season, the last and first frost dates, etc. I find myself using this every year when scheduling out germinating seeds. You can also grab a copy of the year’s current almanac at Walmart, a gardening store, or Amazon.
Through this, I keep a gardening journal. This helps me remember what happened during the growing season from year to year. I take notes on where I planted each item, the pests we dealt with that season, the climate, and how much sun exposure our raised garden beds tend to get. This will help keep your brain straight with all the moving parts of gardening. I recommend getting a blank journal specific to your gardening notes.
In addition, my gardening journal helps me plan the last frost date timeline, determine what crops I want to germinate, and sketch out where I am planting what in my garden. It can also help me calculate how many of each plant I need to grow.
Supplies You Will Need -

- Egg Cartons – (My favorite egg cartons are the paper ones; I get mine from Aldi)
- Seed Starting Dirt – (Pick some up at your local gardening/hardware store. I tend to grab Miraclegrow “Seed Starting” dirt mix at my local Home Depot)
- Seed Packets
- Grocery veggie bags or small plastic bags
How To Make Your Seed Germinating Greenhouse -
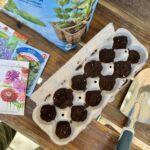
Take your egg carton and cut the lid off. Fill each holder with the seed starting dirt you picked at your local hardware store.
Dig a shallow hole and plant 1-2 seeds into one egg holder. **Be sure to read each seed’s instructions carefully on germination. Some plants require you to plant a couple of seeds; others suggest only planting one**

Cover the seeds with soil and give them a good watering. Be sure to label what seed you planted where. I will use popsicle sticks to stake into the egg carton to know what seeds I planted. The popsicle sticks will also help hold the veggie bag up and prevent it from falling on the fragile seedlings that sprout.
Once the seeds are watered and labeled, place the egg carton into a grocery store veggie bag. I will grab a couple of extra veggie bags each trip in preparation for germinating seeds.

This next step is crucial. Covering your egg cartons with a veggie bag creates a greenhouse. It locks in moisture and provides the perfect growing conditions for these seeds to sprout! Tie the bag closed or use an old bread bag tie to prevent the air from escaping.
Lastly, leave your covered egg cartons on a windowsill, soak up the sun, and start to do your thing! I pull them away from the window on freezing nights so the seedlings don’t get too cold.
If you don’t have a big enough windowsill, use a 3-tiered cart you might have at home, or leave it in front of your sliding door. Get creative with it! You don’t need to have the perfect setup to germinate seeds.

In 1-2 weeks, little sprouts emerge from the dirt. Once they get about an inch tall, you can remove the veggie bag. You’ll continue to let them grow in the sun by the window. Once your seedlings are 2-3” tall, transplant them into a bigger pot so they have enough space to grow.
As spring approaches, you will get warmer days, but it will still be cool at night. On warm, sunny days, you can take your plants out during the day to get used to the breeze and strengthen their stems. They will continue to soak up the sun and prepare to be transferred to your garden beds. Bring them inside before sunset if the temperature drops below 40-45 degrees F!
There you have it. In a week or two, you will see green sprouts coming up, and after your last frost date has passed, you are free to transplant your plants directly into your garden!
If you have more questions, leave a comment. I’d love to help you start germinating your seedlings!
Some Of Our Favorite Recipes -
How To Germinate Your Own Garden Plants
Equipment
- Gardening Shovel
- Watering Can
Materials
- Egg Cartons (Preferably the cardboard kind)
- Seed Starting Dirt (Miracle-Gro Seed Starting Potting Mix)
- Seeds of choice
- Grocery Store Veggie Bags
- Bread Ties or Rubber Bands
Instructions
- Take your egg cartons and cut the lids off of them, leaving just the egg holder.
- Fill each egg holder with your seed starting potting mix.
- Dig a shallow hole, about ¼" deep, and add 1-2 seeds in each egg compartment.
- Cover the planted seeds with a little more dirt and give a good watering. **
- Next, be sure to label each plant you plan very well. I recommend sticking them in the egg carton itself with popsicle sticks. You should be able to poke a hole through the cardboard easily.
- Lastly, cover your planted egg cartons with a veggie bag and tie them with a bread or twist tie. Place next to a sunny window and let the plants do their thing!

0 Comments